To make ice cream in a bag, mix milk, sugar, and vanilla in a smaller bag. Shake it in a larger bag filled with ice and salt.
Making ice cream at home can be fun and easy. Using simple ingredients, you can create a delicious treat without an ice cream maker. This method involves shaking a small bag of milk mixture inside a larger bag filled with ice and salt.
The salt lowers the freezing point of the ice, helping the milk mixture to freeze faster. This quick and straightforward process is perfect for kids and adults alike. Not only does it offer a hands-on experience, but it also results in creamy, homemade ice cream in just a few minutes. Enjoy experimenting with different flavors and add-ins for a personalized touch.
Contents
Introduction To Ice Cream In A Bag
Homemade ice cream is both fun and easy. It tastes better than store-bought. You control the ingredients. No need for fancy machines. Kids can help too. It’s a great family activity. Making your own ice cream saves money. It’s also a fun science experiment. Mixing and shaking the bags is exciting. Plus, you can try different flavors. Homemade ice cream is a delicious treat. Everyone will love it.
Making ice cream in a bag is simple. Kids and adults both enjoy it. It’s a hands-on activity. Perfect for parties and gatherings. Shaking the bag is good exercise. Everyone gets involved. The process is quick. Results are tasty and rewarding. It’s a perfect summer activity. You can also do it indoors. Children learn while having fun. Ice cream in a bag is a hit for all ages.

Gathering Ingredients And Supplies
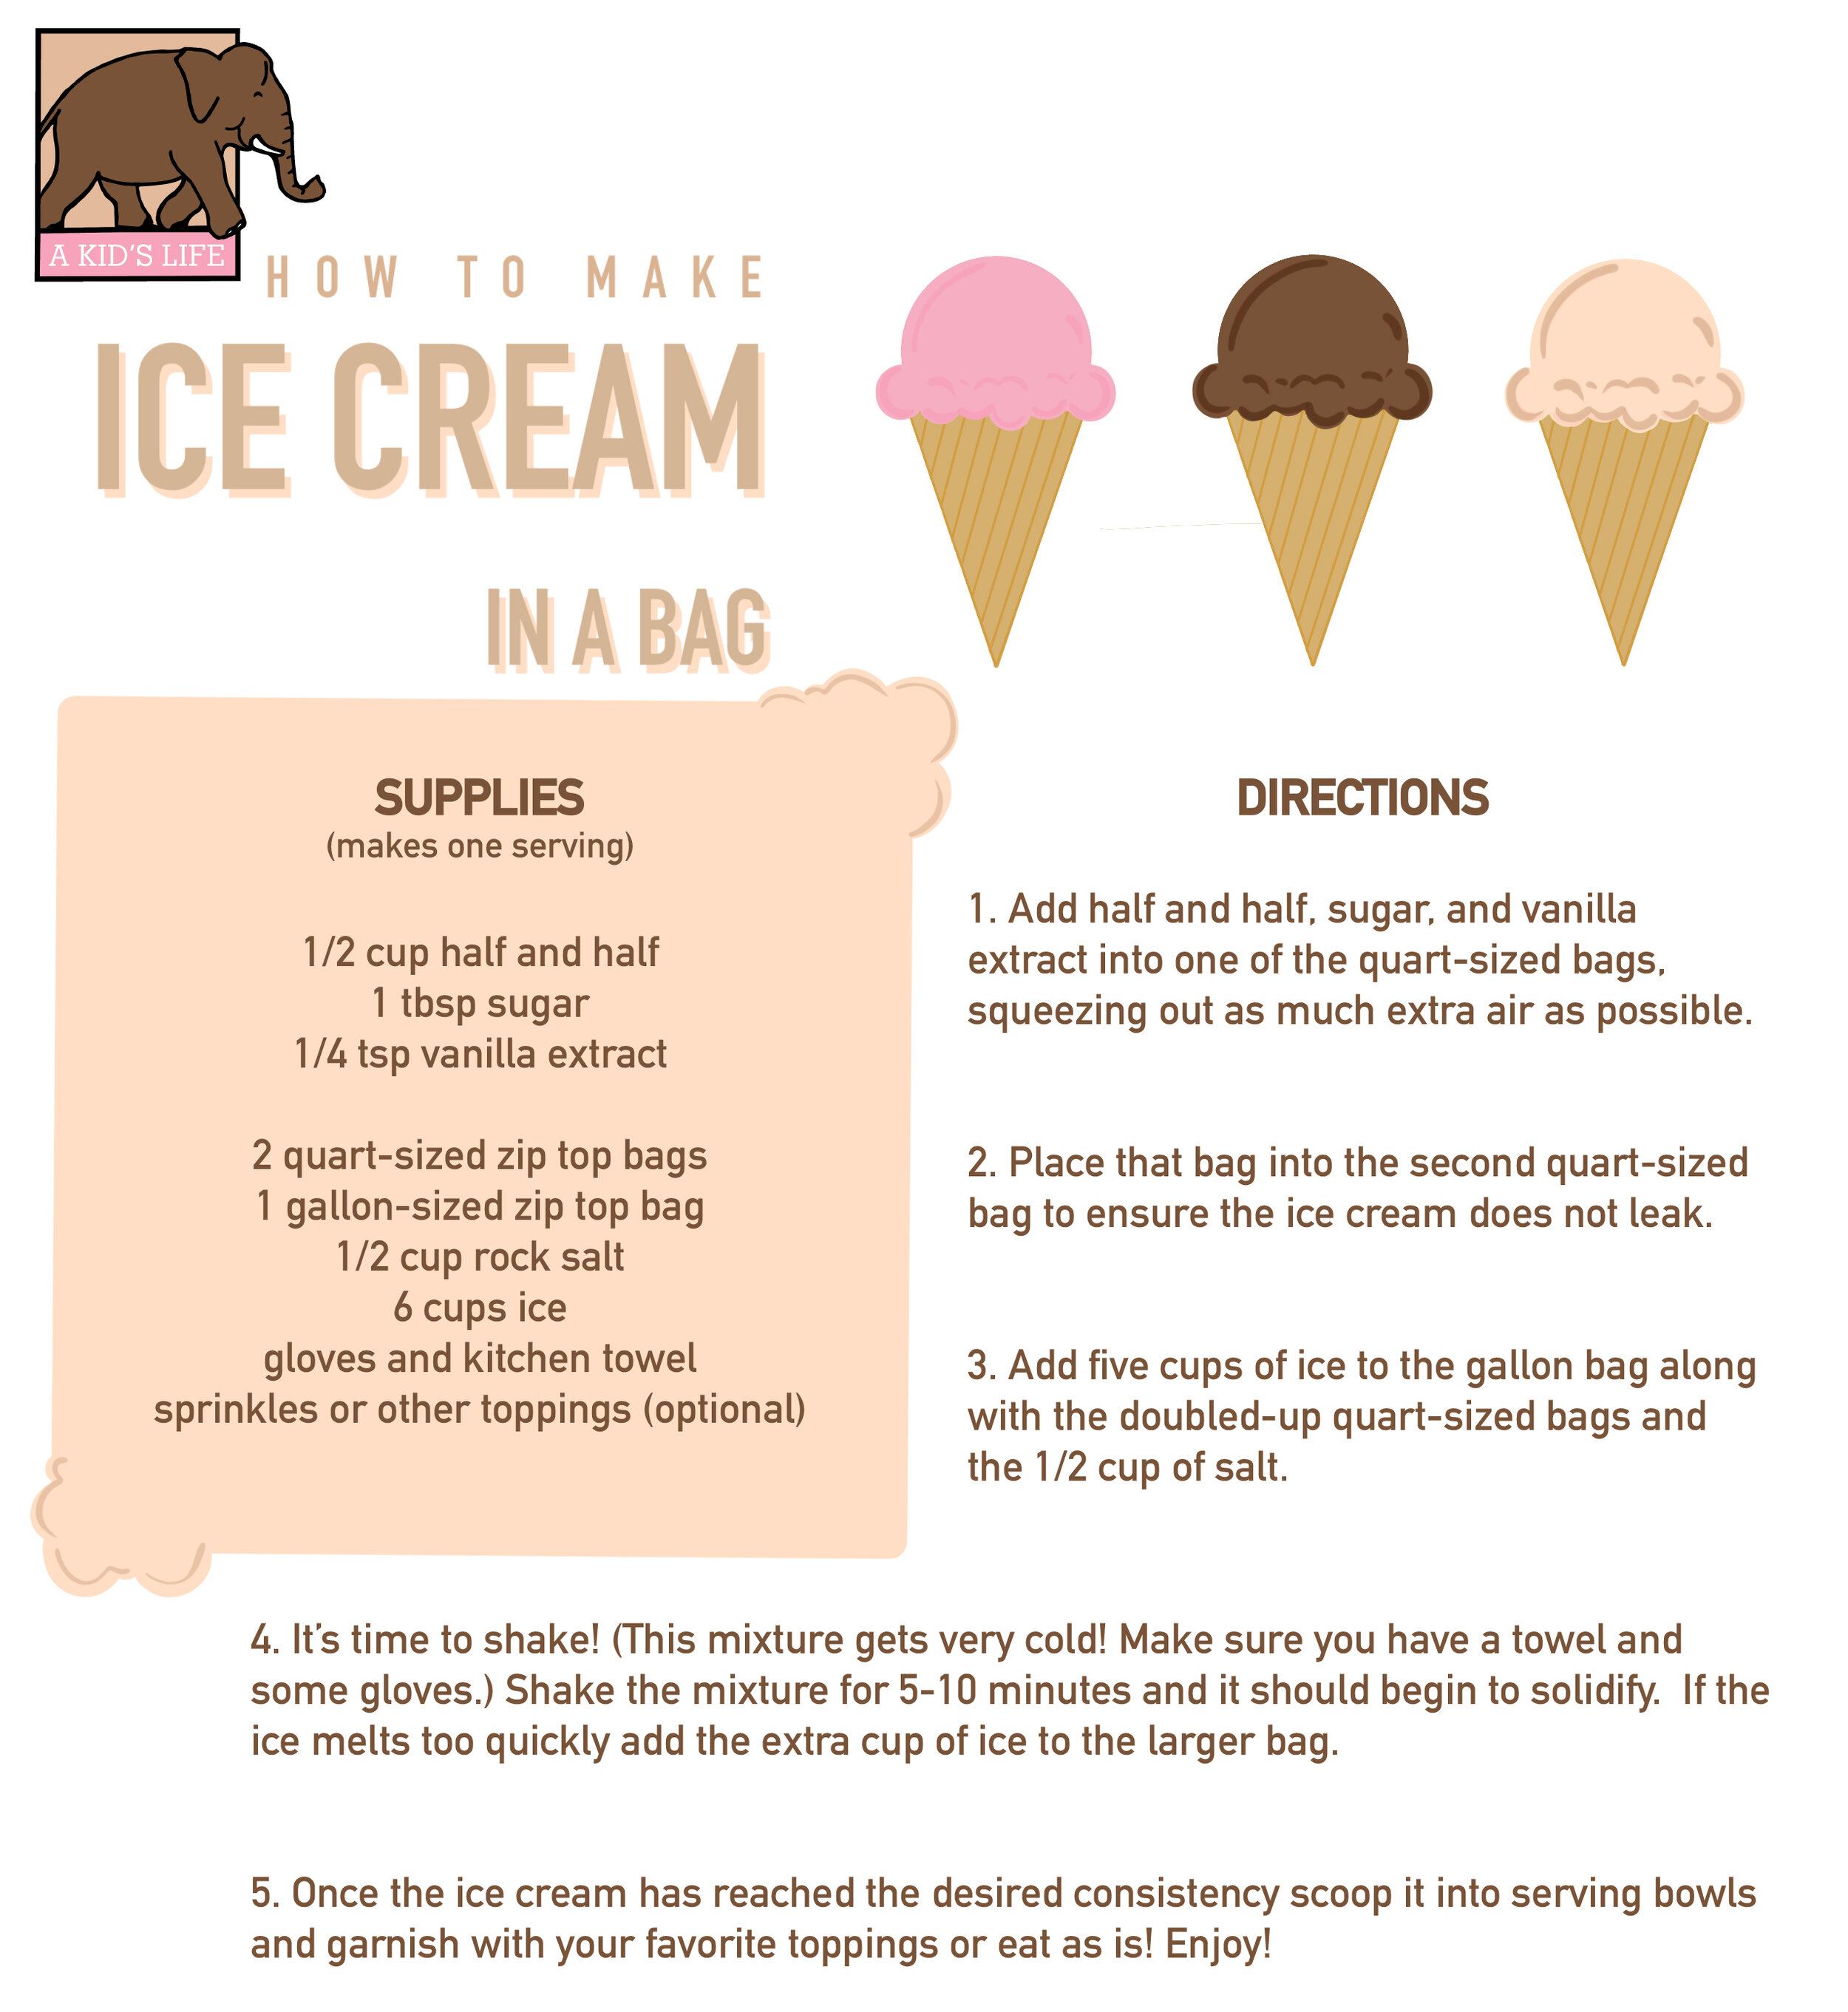
You need 1 cup of milk, 2 tablespoons of sugar, and 1/2 teaspoon of vanilla extract. These are the essential ingredients. You also need ice and salt to make the ice cream freeze.
You will need a quart-sized ziplock bag and a gallon-sized ziplock bag. These bags will hold the ingredients. You also need a measuring cup and spoons for accuracy. A towel or gloves can protect your hands from the cold.
Preparing The Ice Cream Mixture
Combine milk, sugar, and vanilla extract in a resealable bag. Seal tightly to prevent leaks. Mix thoroughly for a smooth base.
Mixing The Ingredients
Start with a large bowl. Pour in one cup of whole milk. Add one cup of heavy cream. Mix in half a cup of sugar. Stir until the sugar dissolves. Add one teaspoon of vanilla extract. Stir the mixture well.
Flavor Variations
Try different flavors. Add two tablespoons of cocoa powder for chocolate. Mix in mashed strawberries for a fruity taste. Add crushed cookies for a crunchy treat. Mix the ingredients well. Enjoy your new flavor.
Setting Up The Bag
To set up the bag for making ice cream, combine ice and salt in a large ziplock bag. Place the smaller bag with the ice cream mixture inside the larger bag and seal tightly.
Using Ziplock Bags
First, gather two Ziplock bags. One should be quart-sized and the other gallon-sized. Pour 1 cup of milk, 2 tablespoons of sugar, and 1/2 teaspoon of vanilla extract into the quart-sized bag. Seal it tightly to prevent leaks. Place this bag inside the gallon-sized bag. Make sure to double-check the seals on both bags.
Adding Ice And Salt
Next, fill the gallon-sized bag with ice cubes. Add 1/2 cup of salt to the ice. Seal the gallon-sized bag securely. The salt helps the ice become colder than usual. This is important for making the ice cream. Shake the bag for about 5 to 10 minutes. Your ice cream should start to form.
Shaking The Bag
Hold the bag with your hands. Shake it up and down. Use a steady rhythm. Ensure the mixture moves around. This helps it freeze evenly.
Try shaking in circles too. This can make the ice cream smoother. Get friends to help if your arms get tired. Pass the bag around. Have fun while shaking.
Shake the bag for about 5 minutes. Check the mixture after this time. Feel for a thick consistency. If it’s not ready, shake for a few more minutes. Patience is key. Good ice cream takes time.
Serving Your Ice Cream
Create delicious ice cream at home using a simple bag method. Combine ingredients, shake, and enjoy your homemade treat.
Check The Consistency
Open the bag carefully. Check if the ice cream is thick and creamy. If it is too soft, shake the bag more. You can also put it back in the freezer for a few minutes. Make sure not to over-freeze it. The ice cream should be easy to scoop. If you like it firmer, freeze it for longer.
Creative Toppings
Top your ice cream with fun toppings. Try sprinkles, chocolate chips, or crushed cookies. Fresh fruit like strawberries or bananas are tasty. You can also add whipped cream or caramel sauce. Nuts like almonds or peanuts add a crunch. Be creative and mix and match toppings. Enjoy your ice cream with a personal touch!
Cleaning Up
Throw away any used plastic bags. Make sure to recycle them if possible. Don’t forget the salt and ice water. These should go down the drain. Be careful with any spills. Wipe them up right away.
Wash all utensils with warm, soapy water. This includes spoons and measuring cups. Rinse them well to remove soap. Dry them with a clean towel. Clean the counter and any other surfaces. This keeps your kitchen tidy and safe.
Tips And Tricks
Using the wrong type of salt can ruin the ice cream. Always use rock salt or coarse salt. Overfilling the bag can cause it to burst. Fill it only halfway. Shaking the bag too hard may make it tear. Shake it gently but consistently. Not sealing the bag properly can let saltwater in. Double-check the seal before shaking.
Add vanilla extract for a classic taste. For a fruity twist, mix in fresh berries. Chocolate chips can make it extra delicious. A pinch of cinnamon adds warmth. Crushed cookies bring a fun crunch. Experiment with different flavors to find your favorite.
Benefits Of Making Ice Cream In A Bag
Making ice cream in a bag is a fun way to learn. Kids can learn about the science behind freezing. They see how salt lowers the freezing point of ice. This hands-on activity makes learning exciting. It also teaches measuring and mixing skills. These are important for math and cooking. Kids get to see how ingredients change form. They start as liquids and become delicious ice cream. This process is both educational and tasty.
Making ice cream in a bag is a great family activity. It brings everyone together. Kids and parents can work as a team. They share tasks like shaking the bag and measuring ingredients. This creates memories and strengthens family bonds. It’s a fun and interactive way to spend time together. Everyone enjoys the reward of homemade ice cream at the end. This simple activity brings lots of joy and laughter.
Frequently Asked Questions
How Long Does It Take To Make Ice Cream In A Bag?
It takes about 15-20 minutes to make ice cream in a bag. The process is quick and easy.
What Ingredients Are Needed For Ice Cream In A Bag?
You need milk or cream, sugar, vanilla extract, ice, and salt. You will also need two resealable bags.
Can Kids Make Ice Cream In A Bag?
Yes, kids can easily make ice cream in a bag. It’s a fun and safe activity for them.
How Do You Mix The Ingredients Properly?
Seal the ingredients in a small bag, place it inside a larger bag filled with ice and salt. Shake well.
Conclusion
Making ice cream in a bag is simple and fun. It’s a great activity for kids and adults. You only need a few ingredients and some basic supplies. Enjoy homemade ice cream anytime with this easy method. Share your tasty creations with friends and family.
Try different flavors and enjoy!