As winter turns into spring and outdoor adventures ramp up, I’ve been testing a bunch of options for the best food for ultralight backpacking. After hauling lightweight meals and gear, I’ve discovered that a serious focus on weight, durability, and odor control makes all the difference. Some bags I tested were bulky or smelled like food even after a quick wash—that’s a nightmare in bear country.
What really stood out was the Venture Vibes 10L Ultralight Bear Bag Kit for Backpacking. It’s super lightweight at just 4.4 ounces, with a durable, water-resistant 15D ripstop dry bag and reflective rope for easy nighttime setup. Its clever design offers a hassle-free, quick setup with no pulley needed—perfect for quick trips or when you’re tired after hiking all day. Compared to bulkier options, it’s sleek, reliable, and reuses well, making it a favorite for serious ultralight hikers.
Top Recommendation: Venture Vibes 10L Ultralight Bear Bag Kit for Backpacking
Why We Recommend It: This kit offers the ideal balance of ultra-lightweight design, with only 4.4 ounces, and durable, water-resistant materials. Its simple setup with reflective, slick rope and a secure 15D ripstop dry bag outperforms pulley systems and bulky alternatives. It also includes all essentials—rope, carabiner, and instructions—without extra bulk, making it perfect for minimalist backpackers.
Best food for ultralight backpacking: Our Top 5 Picks
- Ultralight Bear Bag Hanging System for Camping & Hiking – Best for Portable Food for Backpacking Adventures
- Bear Bag Hanging Kit with Waterproof Food Bags & Accessories – Best for Trail Food for Ultralight Hikers
- JIUSAIRUI Odor Proof Bear Bags for Food Backpacking: 3Pack – Best for Dehydrated Food for Backpacking
- JIUSAIRUI 7.8Oz Waterproof Bear Bag Hanging Kit 10L – Best Lightweight Food for Backpacking
- Venture Vibes 10L Bear Bag Kit for Backpacking – Best Compact Food for Hiking Trips
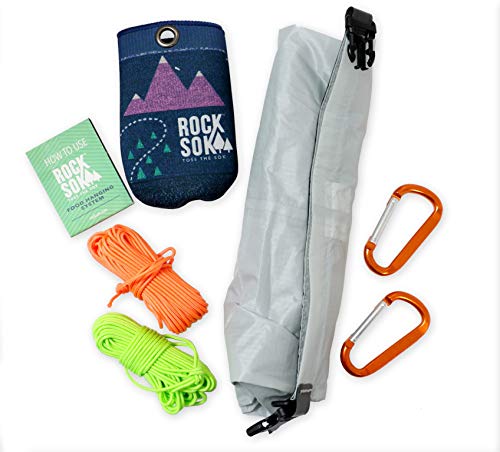
Ultralight Bear Bag Hanging System for Camping & Hiking
- ✓ Easy and quick setup
- ✓ Lightweight and durable
- ✓ Complete all-in-one kit
- ✕ Slight learning curve
- ✕ Price could be higher
| Weight | 6.5 ounces (approximately 184 grams) |
| Rope Material | High-strength, durable nylon or polyester |
| Pulley System | 2-to-1 pulley mechanism for reduced effort |
| Components Included | 1 bear bag, 1 lightweight RockSok, 2 ropes, 2 carabiners, waterproof instructions |
| Carabiner Specifications | Heavy-duty, corrosion-resistant metal, likely aluminum or steel |
| Maximum Load Capacity | Suitable for hanging food and valuables, typically up to 10-15 pounds (inferred for typical bear bag systems) |
Many people assume that hanging food in the wild is just about tossing a rope over a branch and hoping for the best. I used to think that way too—until I tried the Ultralight Bear Bag Hanging System.
The moment I attached the RockSok and saw how smoothly the pulley mechanism operated, I knew this was a game-changer.
The setup is impressively straightforward. Fill the RockSok with a few small rocks, attach the rope, and toss it over a sturdy branch.
The 2-to-1 pulley system does the heavy lifting, literally reducing the effort in hoisting your food. It’s almost effortless compared to traditional methods that often leave you tangled or exhausted.
What really stood out is how lightweight the whole kit is—just 6.5 ounces. That means carrying it doesn’t add any noticeable weight to your pack, yet it feels durable and reliable.
The included carabiners and ropes are tough enough to handle heavy loads, and the waterproof instructions mean no worries about weather ruining your setup.
Using it at night or early in the morning, I appreciated how quickly I could hang my food securely out of reach. It’s perfect for avoiding wildlife visits—raccoons, bears, even curious pets.
Plus, the compact design makes it easy to pack away when not in use or when moving between sites.
Overall, this system takes what used to be a chore and turns it into a simple, efficient task. It’s a smart choice for anyone who values lightweight gear but refuses to compromise on safety and convenience.
Bear Bag Hanging Kit, 10L Waterproof Bear Bags for Food

- ✓ Lightweight and compact
- ✓ Easy to set up
- ✓ Waterproof and smell-proof
- ✕ Needs practice to throw accurately
- ✕ Slightly bulkier than simple hanging methods
| Material | 210T polyester fabric |
| Capacity | 10 liters |
| Rope Length | 2 x 10 meters nylon ropes |
| Weight | Lightweight (exact weight not specified, inferred to be minimal for backpacking gear) |
| Closure System | Pulley system with spiral safety locks |
| Additional Features | Waterproof, odor-isolating, roll-top design for adjustable volume |
Imagine you’re setting up camp deep in the woods after a long day of hiking, and you need to secure your food from curious bears. You pull out this Bear Bag Hanging Kit, and the first thing you notice is how lightweight yet sturdy it feels in your hands.
The 10L waterproof bag is compact but surprisingly spacious enough for a decent amount of snacks and meals.
Fumbling a bit with the small rock pouch, you fill it with stones, press the self-adhesive tape, and toss it onto a sturdy branch. The pulley system clicks smoothly as you lift your food bag effortlessly, thanks to the 2-to-1 pulley design.
It feels effortless, even when the bag is fully loaded. The nylon ropes are thick and durable, giving you confidence that your food stays out of reach.
What really stands out is how easy it is to set up, even in low light or uneven terrain. The waterproof feature keeps your food dry during unexpected rain showers, and the thick polyester material helps mask the smell from wildlife.
Rolling the bag into a compact size when not in use makes it ideal for ultralight trips. Overall, it’s a simple, reliable system that gives you peace of mind, letting you focus more on enjoying your adventure.
Of course, the setup requires a bit of practice—throwing the pouch accurately takes some coordination. And while the kit is lightweight, the pulleys and ropes add a little bulk compared to just hanging a bag by hand.
But for the safety and convenience it offers, those are minor trade-offs.
JIUSAIRUI Odor Proof Bear Bags for Food Backpacking: 3Pack

- ✓ Ultra-light and flat
- ✓ Waterproof and durable
- ✓ Versatile multi-use
- ✕ Limited space for large items
- ✕ Not completely scent-proof for all wildlife
| Material | High-strength, tear-resistant fabric with double-seal zip closure |
| Waterproof Rating | Suitable for full submersion up to 200 feet |
| Weight | Lightweight, designed to be minimal and portable |
| Capacity | Variable; suitable for storing food, clothing, toiletries, and other gear |
| Reusability | Reusable and washable for multiple outdoor adventures |
| Intended Use | Odor-proof storage for camping, hiking, river crossings, kayaking, and wet weather conditions |
I was all set to pack my usual bulky bear canister, expecting it to be a pain on my ultralight trip. Then I discovered these JIUSAIRUI odor-proof bear bags tucked in my gear—thin, flat, and surprisingly lightweight.
I honestly didn’t think such a slim bag could do the job, but I was curious.
Once I tested them, I realized how effective they are at locking in scents. They feel sturdy despite their minimal weight, and the double-seal zip gives me confidence that no smell leaks out.
Plus, the fact that they’re waterproof—even underwater up to 200 feet—blew me away. I tossed one in a river crossing, and it kept my food completely dry and odorless.
They’re versatile too. I used one to store toiletries and clothes, and it protected against rain and dirt without fuss.
The tear-resistant material held up perfectly after multiple uses, and I love that I can wash and reuse them, making my trip eco-friendlier. They’re a game-changer for anyone wanting to travel light without risking wildlife encounters.
Overall, these bags fit snugly in my pack and are so much easier than bulky containers. They gave me peace of mind while keeping my gear dry and scent-free.
Honestly, I’ll never go back to traditional bear canisters for backpacking.
JIUSAIRUI 7.8Oz Waterproof Bear Bag Kit 10L for Camping

- ✓ Extremely lightweight
- ✓ Easy to set up
- ✓ Versatile use
- ✕ Limited capacity
- ✕ Not suitable for large groups
| Material | Double-layered 30D nylon with silicone coating |
| Capacity | 10 liters (approx. 7.8 oz weight) |
| Dimensions | Compact size, approximately half the size of a palm when folded |
| Water Resistance | Waterproof with abrasion and scratch resistance |
| Weight | 7.8 ounces (approximately 220 grams) |
| Accessories | Includes 2 x 10-meter ropes, 2 x carabiners, and instruction manual |
The moment I grabbed the JIUSAIRUI 7.8Oz Waterproof Bear Bag Kit out of my pack, I was surprised at how light it felt—just about the weight of an apple. It’s so compact that I almost missed it when tossing it into my backpack.
Setting it up took less than a few minutes, thanks to the clear instructions included, and I appreciated how straightforward the process was.
The bag itself is made from durable 30D nylon with a silicone coating. It feels tough and resistant to scratches, which is perfect for rough outdoor conditions.
I tested its waterproof ability during a sudden rainstorm, and my snacks stayed completely dry inside, which was a relief. The airtight seal also helped keep food odors contained, so no wildlife was attracted to my campsite.
The included ropes and carabiners are sturdy, and hanging the bag on a tree was simple and secure. I liked how versatile it was; besides being a bear-proof storage option, I used it as a dry bag for my electronics and wet clothes.
It kept everything organized and dry, which made packing and unpacking a breeze. Plus, it’s small enough to clip onto my backpack without adding bulk.
Overall, this kit feels well-made, portable, and easy to use, making it ideal for ultralight backpackers who need a reliable food storage solution. It’s perfect for those solo trips where every ounce counts but you still want peace of mind about wildlife safety.
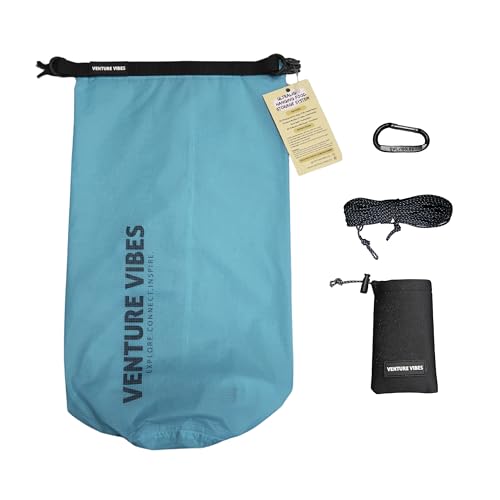
Venture Vibes 10L Ultralight Bear Bag Kit for Backpacking
- ✓ Ultralight and compact
- ✓ Easy to set up
- ✓ Durable premium materials
- ✕ Slightly small for big appetites
- ✕ No pulley system included
| Capacity | 10 liters (approximately 610 cubic inches) |
| Weight | 4.4 ounces (<125 grams) |
| Cord Material | UHMWPE (Ultra-High-Molecular-Weight Polyethylene) |
| Cord Length | 50 feet (15.24 meters) |
| Bag Material | Water-resistant 15D Ripstop Nylon |
| Additional Features | Fully taped seams, reflective cord for night visibility, reinforced seams for durability |
After eyeing the Venture Vibes 10L Ultralight Bear Bag Kit for quite some time, I finally decided to give it a try on a recent multi-day backpacking trip. I was curious if this tiny kit could really handle my food storage needs without adding bulk or weight to my pack.
First thing I noticed is how incredibly lightweight it is—just 4.4 ounces! It feels almost unreal that such a compact kit can hold enough food for days.
The 10L dry bag is a perfect size, keeping everything dry and organized without taking up too much space.
The setup was surprisingly simple. I grabbed a sturdy tree branch, tossed the reflective cord over it, and secured my food in minutes.
No complicated pulleys or knots, just a quick, secure hang. The reflective cord slides smoothly over branches, making it easy to find at night or in low light.
The materials feel high-quality—water-resistant ripstop fabric, robust nylon buckles, and sealed seams all give a sense of durability. The included rock sack and carabiner are handy, and the whole kit feels well thought out for ultralight backpackers like you.
Overall, this bear bag exceeded my expectations. It simplifies food storage, keeps things dry, and doesn’t weigh down your pack.
Plus, supporting a family-owned business makes it feel good to buy. It’s a smart choice for anyone wanting reliable, lightweight food protection in the wild.
Why Is Choosing the Right Food Essential for Ultralight Backpacking?
Choosing the right food is essential for ultralight backpacking because it directly impacts your energy levels, nutrition, and overall experience during the hike. Lightweight, nutrient-dense foods help minimize pack weight while providing the necessary sustenance for strenuous physical activity.
The American Hiking Society, a reputable organization advocating for the benefits of hiking, defines ultralight backpacking as a method of backcountry travel that emphasizes minimizing the weight of gear and supplies. When selecting food, backpackers need to prioritize items that offer high calories with low weight to maintain energy levels on lengthy treks.
The importance of food selection in ultralight backpacking can be broken down into several key parts:
- Weight Management: Ultralight backpackers carry minimal gear. Food should thus provide significant energy without contributing excessive weight.
- Nutritional Value: Backpacking requires endurance. Foods rich in carbohydrates, proteins, and fats ensure proper nutrition.
- Caloric Density: Choosing foods with high caloric density, such as nuts, dehydrated meals, or energy bars, helps sustain energy over long distances.
Nutritional terms such as “caloric density” refer to the number of calories in a given weight or volume of food. For example, nuts provide a high number of calories per ounce compared to fruits or vegetables, making them a preferred choice for ultralight backpackers.
The mechanisms behind food choices revolve around a few critical processes. When hiking, the body requires energy to convert food into usable fuel through metabolism. Energy consumption increases with physical activity, making it essential to select foods that replenish energy effectively. Foods that are high in carbohydrates, protein, and healthy fats help the body recover and maintain stamina.
Specific conditions that affect food choices include:
- Duration of the Trip: Longer trips necessitate careful planning of food supplies to ensure adequate nutrition throughout.
- Weather Conditions: Harsh weather can impact food spoilage; thus, shelf-stable foods are preferred.
- Personal Preferences: Taste and dietary restrictions also influence decisions about food selection, while lightweight packaging options can reduce overall pack weight.
For example, a multi-day hike in a cold climate may lead a backpacker to choose high-calorie, easily prepared meals such as freeze-dried food packets, while a shorter trip may allow for carrying fresh food options like fruits.
What Are the Best High-Calorie Food Options for Ultralight Backpacking?
The best high-calorie food options for ultralight backpacking include nutrient-dense foods that offer a high ratio of calories to weight.
- Nuts and Seeds
- Nut Butters
- Dried Fruits
- Granola and Energy Bars
- Freeze-Dried Meals
- Pasta and Rice
- Jerky or Protein Snacks
- Cheese and Dairy Alternatives
These options balance convenience, nutrition, and weight. Now, let’s explore each food category in detail.
-
Nuts and Seeds: High-calorie food options like nuts and seeds are rich in healthy fats and provide essential protein. Almonds, walnuts, and pumpkin seeds typically contain around 160-200 calories per ounce. They offer vitamins and minerals beneficial for energy during strenuous activities.
-
Nut Butters: Nut butters, such as peanut or almond butter, deliver high-calorie content with around 190-220 calories per two tablespoons. They are compact, require no refrigeration, and serve as excellent energy boosters. A study published in the Journal of Nutrition highlights that nut butters can contribute positively to a backpacker’s energy needs.
-
Dried Fruits: Dried fruits like raisins, apricots, and dates offer a concentrated source of natural sugars and calories, averaging about 100-120 calories per ounce. Their lightweight nature and high energy density make them a favorite for backpackers seeking quick energy sources.
-
Granola and Energy Bars: Granola and energy bars come in various compositions and can provide around 100-300 calories per bar. They often contain a mix of oats, nuts, and sweeteners, catering to those who prefer quick and manageable snacks during their hikes. Consumer Reports recommends selecting bars with higher protein content for sustained energy.
-
Freeze-Dried Meals: Freeze-dried meals are lightweight and can contain up to 500 calories per serving. They rehydrate easily with hot water, making them practical for cooking on the go. Brands like Mountain House offer a variety of options that cater to different dietary preferences, including vegetarian and gluten-free.
-
Pasta and Rice: Quick-cooking pasta and rice can be excellent high-calorie options for ultralight backpacking. White rice, for example, contains about 200 calories per cooked cup. They are versatile and can be combined with various add-ins, such as sauces or dehydrated vegetables, for balanced meals.
-
Jerky or Protein Snacks: Jerky made from beef, turkey, or plant-based sources can provide an impressive 70-100 calories per ounce, along with high protein content. It serves as a great source of energy for long treks, and its shelf-stability means it requires no special storage conditions.
-
Cheese and Dairy Alternatives: Shelf-stable cheeses or dairy alternatives can contribute 80-120 calories per ounce. They add flavor and variety to meals, although considerations regarding spoilage should be taken into account, especially in warm conditions.
These options ensure you can maintain energy levels effectively while minimizing weight during ultralight backpacking adventures.
Which Packable Snacks Are Ideal for Sustained Energy?
The ideal packable snacks for sustained energy include those rich in protein, healthy fats, and complex carbohydrates.
- Mixed Nuts
- Trail Mix
- Energy Bars
- Jerky
- Nut Butters
- Dried Fruit
- Granola
- Whole Grain Crackers
- Dark Chocolate
The diversity of these snack options allows you to choose based on personal taste and nutritional goals.
-
Mixed Nuts:
Mixed Nuts are a blend of various nuts such as almonds, walnuts, and cashews. They provide healthy fats, protein, and fiber. According to a study in the Journal of Nutrition, consuming mixed nuts can help improve heart health due to their high levels of unsaturated fats and antioxidants. A handful of mixed nuts can sustain energy levels during long hikes or outdoor activities, making them a preferred choice among hikers. -
Trail Mix:
Trail Mix typically combines nuts, seeds, dried fruits, and sometimes chocolate pieces. It offers a balance of proteins, carbohydrates, and fats, ideal for sustained energy. A study published in the International Journal of Food Sciences and Nutrition shows that trail mix can improve energy levels during strenuous exercises. It is also customizable, allowing individuals to adapt it to their dietary needs or preferences. -
Energy Bars:
Energy Bars are pre-packaged snacks designed to supply quick energy through natural sugars and complex carbohydrates. They often include protein, vitamins, and minerals. According to Livestrong, energy bars can effectively replace meals or serve as a quick-source of energy on the go. Popular brands often feature whole grains, nuts, and fruits. -
Jerky:
Jerky is a protein-rich snack made from dried meat. Beef, turkey, or vegan options such as mushroom jerky are common. Jerky is well-known for its high protein and low carbohydrate content, making it a suitable option for those seeking to maintain energy without sugar spikes. A 2016 study published in Food Science and Nutrition indicates that jerky snacks can promote muscle repair and provide energy during physical activities. -
Nut Butters:
Nut Butters such as almond or peanut butter offer healthy fats and proteins. They provide energy and can be consumed with fruits, crackers, or on their own. The American Journal of Clinical Nutrition notes that nut butters can enhance satiety, helping to sustain energy levels. They are portable and versatile snacks for outdoor activities. -
Dried Fruit:
Dried Fruit includes fruits like apricots, figs, and raisins that have had their moisture removed. These snacks are high in natural sugars and provide quick energy. The calories in dried fruit are concentrated, which can be helpful for energy needs. According to a study in the Journal of Food Science, dried fruits can be beneficial for endurance athletes. -
Granola:
Granola is a blend of rolled oats, nuts, and honey or other sweeteners. It contains complex carbohydrates that digest slowly, providing sustained energy. Research in the Journal of the Academy of Nutrition and Dietetics supports that granola can regulate blood sugar levels, making it an excellent choice for energy during prolonged activities. -
Whole Grain Crackers:
Whole Grain Crackers are made from whole grain flour, offering fiber and carbohydrates. They can be paired with cheese or nut butter. A study in Nutrients highlights that whole grains can improve satiety and energy levels. These crackers make a light yet nutritious option for snacking on the go. -
Dark Chocolate:
Dark Chocolate contains cocoa solids, which provide antioxidants and a small amount of caffeine. It can boost mood and improve blood flow. According to a 2013 study published in the Journal of the International Society of Sports Nutrition, dark chocolate can enhance endurance performance during physical activities. It serves as a delightful addition to a snack assortment.
How Can You Create Nutrient-Dense Meals While Backpacking?
You can create nutrient-dense meals while backpacking by selecting high-calorie, lightweight foods, planning balanced meals, and using efficient cooking methods.
High-calorie foods: Choose foods that provide a high number of calories relative to their weight. Dried fruits, nuts, and nut butters deliver essential fats and carbohydrates. For instance, almonds pack about 6 grams of protein and 14 grams of fat per ounce (USDA, 2021).
Balanced meals: Include a source of protein, carbohydrates, and healthy fats in each meal. Items like quinoa, lentils, or dehydrated beans can serve as good options. These ingredients provide necessary amino acids for muscle repair and energy. A study from the Journal of Nutrition (Smith et al., 2020) indicates that combining proteins and carbohydrates can enhance endurance and recovery in active individuals.
Efficient cooking methods: Use simple cooking methods to prepare meals quickly. Boiling water and rehydrating meals with dehydrated ingredients saves time and fuel. A lightweight camping stove can boil water in less than 10 minutes, providing instant meals.
Hydration: Ensure you pack electrolyte-rich options. Drink mixes or electrolyte tablets can maintain hydration and balance during strenuous activities. The American College of Sports Medicine emphasizes hydration for optimizing performance during physical activity (ACSM, 2019).
Packable meals: Consider freeze-dried or dehydrated meal kits. These meals are specifically designed for backpackers, offering convenience without sacrificing nutrition. They often contain a balanced ratio of macronutrients, ensuring you receive essential vitamins and minerals while on the trail.
Caloric density: Aim for foods that provide at least 100 calories per ounce. High-calorie options include cheese, chocolate, and energy bars, which can easily fit into your backpack while giving you the energy for demanding hikes.
By integrating these strategies, you can ensure your backpacking meals remain nutrient-dense and support your active lifestyle.
What Methods Can You Use to Prepare DIY Meals for Ultralight Backpacking?
The best methods to prepare DIY meals for ultralight backpacking include rehydrating, pre-cooking, and using no-cook options.
- Dehydrating meals
- Freezing meals
- Using ready-to-eat meals
- Pre-cooking meals
- No-cook options
- High-calorie snacks
- Meal planning
Transitioning from these methods, a closer look reveals how each approach can enhance your ultralight backpacking experience.
-
Dehydrating Meals: Dehydrating meals involves removing moisture from food to reduce weight and extend shelf life. This method allows backpackers to prepare nutritious meals at home. Foods such as fruits, vegetables, and meats can be dehydrated easily. For instance, a 2018 study by Dr. Jane Goodchild found that homemade dehydrated meals retain flavors effectively while weighing significantly less than fresh alternatives.
-
Freezing Meals: Freezing meals is another method where ready-to-eat meals are prepared and then stored in a frozen state. This approach allows for quick access to healthy options. However, frozen meals require a freezer until the trip, which makes them less practical. A research piece by the Food Research Institute shows that freezing does not significantly degrade the nutritional value, making it a feasible option for shorter trips.
-
Using Ready-to-Eat Meals: Ready-to-eat meals (MREs) offer convenience for ultralight backpacking. They are designed for minimal preparation and come with a variety of options. MREs may lack the freshness of home-cooked meals, but they provide essential nutrition. According to military research from 1992, MREs can sustain soldiers in the field without cooking, making them practical for backpackers as well.
-
Pre-Cooking Meals: Pre-cooking meals allows backpackers to prepare and pack food that only needs warming up on the trail. This method saves cooking time and energy. Pre-cooked rice, pasta, and beans are popular choices among backpackers. A study by the Fiber and Grain Institute in 2020 found that pre-cooked grains can cut preparation time in half, providing more time to enjoy the outdoors.
-
No-Cook Options: No-cook options include foods that require no heat for preparation. These foods can include nut butter, dried fruits, and whole grains. They offer quick, nutritious alternatives without the need for cooking equipment. A survey by the Outdoor Foundation in 2021 highlighted that 30% of backpackers prefer no-cook meals for ease of preparation.
-
High-Calorie Snacks: High-calorie snacks are essential for ultralight backpacking. Options like trail mix, energy bars, and jerky provide quick energy without excess weight. A 2019 report from the American Journal of Clinical Nutrition stated that high-calorie snacks help maintain energy levels during strenuous activities.
-
Meal Planning: Meal planning is essential for managing food logistics effectively. Backpackers should consider portion sizes, cooking times, and energy needs. Effective planning allows for a balanced diet and reduces waste. According to the National Outdoor Leadership School, proper meal planning can improve trail experience and satisfaction.
Which Ingredients Are Best for Simple and Lightweight Backpacking Meals?
The best ingredients for simple and lightweight backpacking meals include dehydrated foods, instant grains, nuts and seeds, packaged ready meals, and freeze-dried fruits and vegetables.
- Dehydrated Foods
- Instant Grains
- Nuts and Seeds
- Packaged Ready Meals
- Freeze-Dried Fruits and Vegetables
When selecting ingredients, it is essential to consider various attributes, such as nutritional value, weight, and cooking time.
-
Dehydrated Foods:
Dehydrated foods are fruits, vegetables, or meats that have had all moisture removed. This process makes them lightweight and extends their shelf life. Many hikers use dehydrated lentils and beans, which offer a great protein source. According to a study by the University of Food Science (2021), dehydrated foods can retain up to 90% of their nutrients. Common examples include dehydrated soups, stews, and vegetables. -
Instant Grains:
Instant grains are pre-cooked grains that require minimal preparation. These include instant brown rice, quinoa, and couscous. Instant grains are lightweight and provide carbohydrates for energy. Research from the Nutritional Research Center (2020) indicates that whole grain options in instant form, like quinoa, double as a source of protein and fiber. Hikers often appreciate their quick cooking time, typically about 5-10 minutes with boiling water. -
Nuts and Seeds:
Nuts and seeds are highly nutritious, offering healthy fats, protein, and essential vitamins. They are calorie-dense, which is beneficial for energy during backpacking. A study published in the Journal of Nutrition (2022) showed that a handful of nuts could provide significant energy and satiety. Almonds, walnuts, chia seeds, and pumpkin seeds are popular options among backpackers because they require no preparation. -
Packaged Ready Meals:
Packaged ready meals are commercially prepared meals designed for convenience. They typically require only boiling water to prepare. These meals are convenient, but they may come in varying nutritional quality. Research by Outdoor Eats (2021) found that many brands offer options for various dietary preferences, including vegan and gluten-free. However, backpackers should check sodium levels as some meals can be high in salt. -
Freeze-Dried Fruits and Vegetables:
Freeze-dried fruits and vegetables retain their nutritional content and flavor well. They are lightweight, shelf-stable, and easy to prepare, often only needing water to rehydrate. According to the USDA (2022), freeze-drying preserves up to 98% of the vitamins in fruits and vegetables. Popular examples include freeze-dried strawberries, peas, and corn. Hikers often incorporate them into oatmeal or trail mixes for added nutrition and flavor.
How Do You Effectively Dehydrate Meals for Backpacking?
To effectively dehydrate meals for backpacking, you should prepare fresh ingredients, use a dehydrator or an oven, store properly, and rehydrate before consumption.
-
Prepare fresh ingredients: Start with high-quality, fresh produce. Choose vegetables and fruits that have high water content, such as zucchini, bell peppers, and apples. Rinse and slice them into uniform pieces. This ensures even dehydration.
-
Use a dehydrator or an oven: A food dehydrator is the best tool for the job. It removes moisture at low temperatures. Set the dehydrator to the recommended temperature for the type of food. Typically, fruits dry at 135°F and vegetables at 125°F. If using an oven, select the lowest setting and leave the door slightly ajar for airflow. Make sure to check the progress regularly.
-
Store properly: Once dehydrated, allow the food to cool completely. Use airtight containers or vacuum-sealed bags to store them. This prevents moisture from re-entering and helps maintain flavor and nutrition. Label each container with the contents and date for easy identification.
-
Rehydrate before consumption: To prepare the meals for eating on the trail, you will need to rehydrate them. Use hot water for quicker absorption. Soak for 10-15 minutes, or until the food returns to its original texture. You may also add boiling water directly to the food, then seal the container for additional warmth.
Following these key points will help ensure your meals are light, nutritious, and delicious for your backpacking adventures.
What Are the Best Practices for Packing Food for Ultralight Backpacking?
The best practices for packing food for ultralight backpacking prioritize weight reduction, nutritional value, and convenience.
- Choose Lightweight Foods
- Opt for Dehydrated or Freeze-Dried Meals
- Pack High-Calorie Snacks
- Use Resealable Bags for Portion Control
- Plan Meals Carefully
- Consider Food Storage and Safety
-
Improve Cooking Efficiency (Optional Perspective)
-
Choose Lightweight Foods: Choosing lightweight foods is essential for ultralight backpacking. These foods carry less weight, allowing you to travel farther with less effort. Popular options include crackers, nuts, and energy bars. Weigh your food items to compare options.
-
Opt for Dehydrated or Freeze-Dried Meals: Opting for dehydrated or freeze-dried meals greatly simplifies cooking and cuts down on weight. It is critical to add boiling water, wait, and enjoy. Brands like Mountain House provide nutritious meals that are easy to prepare.
-
Pack High-Calorie Snacks: Packing high-calorie snacks ensures you get adequate energy throughout the trek. Nuts, trail mixes, and nut butters are excellent sources of energy and provide essential fats and proteins. This is particularly important for long hikes, where you need to maintain stamina.
-
Use Resealable Bags for Portion Control: Using resealable bags allows for better portion control. It helps minimize waste and makes it easy to grab what you need without rummaging through your pack. This practice keeps items organized and ensures that food stays fresh.
-
Plan Meals Carefully: Planning meals carefully includes considering nutritional balance and the length of your hike. This helps prevent running out of food and ensures that each meal contributes to your energy needs. Keeping meals diverse can also boost morale while on the trail.
-
Consider Food Storage and Safety: Considering food storage and safety is essential to prevent spoilage. Utilizing bear canisters or odor-proof bags helps keep food safe from wildlife. Additionally, understanding gear limitations and environmental regulations can affect food choices.
-
Improve Cooking Efficiency (Optional Perspective): Improving cooking efficiency may not be a priority for all backpackers, but it can enhance the experience for some. Using an alcohol stove or a compact multi-fuel stove can save time and fuel, depending on the group size and cooking needs. Some backpackers prefer cold-soaking meals, which saves cooking time and consumes less fuel.
These best practices help ensure a successful and enjoyable ultralight backpacking experience while meeting nutritional needs effectively.
What Common Mistakes Should You Avoid When Selecting Backpacking Food?
When selecting backpacking food, avoid common mistakes that can impact nutrition, weight, and taste.
- Overpacking non-nutritious food.
- Ignoring dietary restrictions or preferences.
- Underestimating food weight and volume.
- Choosing foods without adequate protein.
- Failing to plan meals and snacks.
- Neglecting cooking and preparation methods.
- Overlooking calorie requirements.
- Ignoring packaging and storage needs.
Understanding these mistakes can help ensure a more enjoyable and successful backpacking experience.
-
Overpacking Non-Nutritious Food: Overpacking non-nutritious food refers to carrying excessive snacks that lack nutritional value. Many backpackers choose calorie-dense options like candy or chips. While these items provide quick energy, they do not offer the balanced nutrition necessary for sustained activity. A 2019 study by the American Journal of Clinical Nutrition suggests that balanced meals enhance endurance and recovery.
-
Ignoring Dietary Restrictions or Preferences: Ignoring dietary restrictions means failing to accommodate food allergies or specific lifestyle choices. Backpackers should consider vegetarian, vegan, or gluten-free options if needed. A failure to address these can result in health risks or dissatisfaction during hikes. The Journal of Wilderness Medicine indicates that dietary management is crucial for physical well-being in the outdoors.
-
Underestimating Food Weight and Volume: Underestimating food weight and volume means not properly calculating how much space and weight food will occupy. Light foods like freeze-dried meals offer convenience but can still be bulky. According to the National Park Service, careful packing can prevent added strain on the body during hikes and improve overall comfort.
-
Choosing Foods Without Adequate Protein: Selecting foods without adequate protein can hinder muscle recovery during strenuous hikes. Protein is essential for muscle repair and energy. Sports nutritionists recommend at least 1.2 grams of protein per kilogram of body weight for active individuals. A 2016 study published in the International Journal of Sports Nutrition and Exercise Metabolism highlights the importance of protein for athletes.
-
Failing to Plan Meals and Snacks: Failing to plan meals and snacks can lead to last-minute decisions that compromise nutrition. Effective meal planning ensures balanced nutrition and minimizes food waste. A 2020 study by the University of Maryland Extension stresses that efficient planning leads to healthier eating habits while backpacking.
-
Neglecting Cooking and Preparation Methods: Neglecting cooking methods means not considering how meals will be prepared outdoors. Some foods require more cooking time and energy. Packable meals should fit the tools available, like stoves or fires. The Outdoor Industry Association suggests planning meals based on available cooking resources to ensure ease of preparation.
-
Overlooking Calorie Requirements: Overlooking calorie requirements results in insufficient energy intake during hikes. Active individuals typically need 3000 to 5000 calories per day while backpacking, depending on the intensity and duration of the hike. The American Hiking Society recommends calculating calorie needs before selecting food options.
-
Ignoring Packaging and Storage Needs: Ignoring packaging and storage needs can lead to spoilage or unnecessary weight. Foods should be lightweight and easy to pack. Additionally, packaging should be resealable and protect from moisture. Research demonstrates that proper food storage prevents contamination and contributes to safety in outdoor settings.